書いてる理由
- pytorchを基礎からもう一回
参考
https://arxiv.org/pdf/1612.01105.pdf
詳細
pytorch_work/predict.py at master · ys201810/pytorch_work · GitHub
昨日は疲れすぎアンド頭痛でさすがに更新できなかったので、今日2回更新。
一つ目はこれまでのPSPネットで作ったモデルで予測するスクリプトの作成。
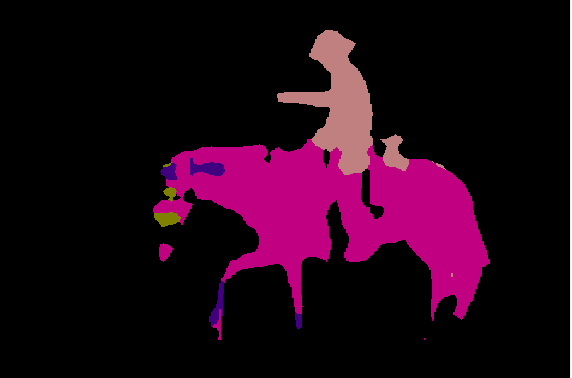
セマンティックセグメンテーションは、以下の様に画像をピクセルレベルで何が写っているかを判定するもの。


この予測結果と合成結果を出すスクリプトの解説。
いつものごとく全体は一番下に。パーツパーツで解説。
モデルと予測画像準備
netの部分は、PSPNetを出力クラス数21で読み込み、学習済みのパラメータをload。
予測したい画像をPILで読み込んで、mean/stdを使って学習時にやった正規化を同様に実施。
    net = PSPNet(n_classes=21)
    state_dict = torch.load('./weights/pspnet50_30.pth', map_location={'cuda:0': 'cpu'})
    net.load_state_dict(state_dict)

    image_file = './data/cowboy-757575_1280.jpg'
    img = Image.open(image_file)
    img_width, img_height = img.size
    plt.imshow(img)
    plt.show()

    color_mean = (0.485, 0.456, 0.406)
    color_std = (0.229, 0.224, 0.225)
    transform = DataTransform(input_size=475, color_mean=color_mean, color_std=color_std)
VOCのパレット情報の取得
予測にVOCデータ不要じゃね?って自分でも思ったのだけど、paletteの情報が欲しいのでmake_datapath_listでval_anno_listを取得するために実行。
p_palette = anno_class_img.getpalette()でpaletteを取得し、後ほどputpaletteで色付けしている。
あんま重要ではない。
    data_root_path = '/path/to/VOCdevkit/VOC2012'
    train_img_list, train_anno_list, val_img_list, val_anno_list = make_datapath_list(data_root_path)

    anno_file_path = val_anno_list[0]
    anno_class_img = Image.open(anno_file_path)
    p_palette = anno_class_img.getpalette()
    phase = 'val'
    img, anno_class_img = transform(phase, img, anno_class_img)
予測の実施
net.eval()でモデルを予測モードに変え、x = img.unsqueeze(0)でバッチサイズの次元を追加[(3, 475, 475)を(1, 3, 475, 475)に。3はRGBのchannel、475は縦横サイズ]
net(x)で予測実施してoutputs[0]には最終層をUpsamplingしたものが返ってきている。
これを元の大きさにresizeして出力結果をVOCのパレットの対応で色を分けて表示したのが、冒頭にある「予測結果」の図。
予測自体はこれで終わりで、重ねた画像を作るための処理を次から。
    net.eval()
    x = img.unsqueeze(0)
    outputs = net(x)
    y = outputs[0]

    y = y[0].detach().numpy()
    y = np.argmax(y, axis=0)
    anno_class_img = Image.fromarray(np.uint8(y), mode='P')
    anno_class_img = anno_class_img.resize((img_width, img_height), Image.NEAREST)
    anno_class_img.putpalette(p_palette)
    plt.imshow(anno_class_img)
    plt.show()
重ねて確認するための画像作成
重ねるためには透明度を画像の中で指定する必要があるので、RGBAに変換。
画像の縦横それぞれのループで画像全体を走査し、
f pixel[0] == 0 and pixel[1] == 0 and pixel[2] == 0:これはRGBが全て0なので黒を指していて、黒の時は透過する必要がないのでそのまま、
それ以外はRGBAのA=150をセットする。
これをオリジナルのイメージにImage.alpha_composite()で重ねて表示したのが冒頭の「合成結果」。
    trans_img = Image.new('RGBA', anno_class_img.size, (0, 0, 0, 0))
    anno_class_img = anno_class_img.convert('RGBA')

    for x in range(img_width):
        for y in range(img_height):
            pixel = anno_class_img.getpixel((x, y))
            r, g, b, a = pixel

            if pixel[0] == 0 and pixel[1] == 0 and pixel[2] == 0:
                continue
            else:
                trans_img.putpixel((x, y), (r, g, b, 150))

    img = Image.open(image_file)
    result = Image.alpha_composite(img.convert('RGBA'), trans_img)
    plt.imshow(result)
    plt.show()
まとめ
まずまずの精度なんじゃないかなーって感じ。馬の顔と人間の足がミスってる。。
一旦これでpytorchでPSPNetは終了。
次は、物体検出やろうか、NLPやろうか悩み中。物体検出やりたいけどこっちはめっちゃ大変なので、一回NLP挟んでからかなー
どっちにしよ?
全体のコード
def main():
    net = PSPNet(n_classes=21)
    state_dict = torch.load('./weights/pspnet50_30.pth', map_location={'cuda:0': 'cpu'})
    net.load_state_dict(state_dict)

    image_file = './data/cowboy-757575_1280.jpg'
    img = Image.open(image_file)
    img_width, img_height = img.size
    plt.imshow(img)
    plt.show()

    color_mean = (0.485, 0.456, 0.406)
    color_std = (0.229, 0.224, 0.225)
    transform = DataTransform(input_size=475, color_mean=color_mean, color_std=color_std)

    data_root_path = '/Users/shirai1/work/pytorch_work/pytorch_advanced/3_semantic_segmentation/data/VOCdevkit/VOC2012'
    # data_root_path = os.path.join('/home', 'yusuke', 'work', 'data', 'VOCdevkit', 'VOC2012')
    train_img_list, train_anno_list, val_img_list, val_anno_list = make_datapath_list(data_root_path)

    anno_file_path = val_anno_list[0]
    anno_class_img = Image.open(anno_file_path)
    p_palette = anno_class_img.getpalette()
    phase = 'val'
    img, anno_class_img = transform(phase, img, anno_class_img)

    net.eval()
    x = img.unsqueeze(0)
    outputs = net(x)
    y = outputs[0]

    y = y[0].detach().numpy()
    y = np.argmax(y, axis=0)
    anno_class_img = Image.fromarray(np.uint8(y), mode='P')
    anno_class_img = anno_class_img.resize((img_width, img_height), Image.NEAREST)
    anno_class_img.putpalette(p_palette)
    plt.imshow(anno_class_img)
    plt.show()

    trans_img = Image.new('RGBA', anno_class_img.size, (0, 0, 0, 0))
    anno_class_img = anno_class_img.convert('RGBA')

    for x in range(img_width):
        for y in range(img_height):
            pixel = anno_class_img.getpixel((x, y))
            r, g, b, a = pixel

            if pixel[0] == 0 and pixel[1] == 0 and pixel[2] == 0:
                continue
            else:
                trans_img.putpixel((x, y), (r, g, b, 150))

    img = Image.open(image_file)
    result = Image.alpha_composite(img.convert('RGBA'), trans_img)
    plt.imshow(result)
    plt.show()